
Complete Guide to Paper Sizes: A4 vs US Letter & ISO Standards
Complete Guide to Paper Sizes
Master American, International, and English paper standards for your printing projects.
Understanding Paper Size Standards
Paper sizing can be confusing because different regions use different standards. Here's what you need to know to make informed decisions for your printing projects.
American ANSI Paper Sizes
The ANSI (American National Standards Institute) system is based on
the common Letter size (8.5" × 11") and scales proportionally.
Each larger size doubles the area of the previous size.
The aspect ratio (a ratio comparing one side to the other) is
different for every size.
| ANSI Size | Common Name | Inches (W × H) | Millimeters (W × H) | Common Uses |
|---|---|---|---|---|
| ANSI A | Letter | 8.5 × 11 | 216 × 279 | Business letters, documents, booklets |
| ANSI B | Ledger/Tabloid | 11 × 17 | 279 × 432 | Newspapers, large reports |
| ANSI C | — | 17 × 22 | 432 × 559 | Architectural drawings |
| ANSI D | — | 22 × 34 | 559 × 864 | Engineering drawings |
| ANSI E | — | 34 × 44 | 864 × 1118 | Large format displays |
International ISO 216 Paper Sizes
The ISO 216 standard uses the √2 (1.414) aspect ratio, which means
when you fold any size in half, you get the next smaller size with the
same proportions. If you know the width, you multiply that value x
1.414 and you get the height. It's that simple.
The A0 size has an area of exactly one square meter.
Series A is the most common.
Series B
is used for other products.
Series C (not shown) refers to the sizes of
envelopes.
A-Series (General Use)
| Size | Millimeters | Inches | Common Use |
|---|---|---|---|
| A2 | 420 × 594 | 16.5 × 23.4 | Small posters |
| A3 | 297 × 420 | 11.7 × 16.5 | Magazines, reports |
| A4 | 210 × 297 | 8.3 × 11.7 | Standard documents |
| A5 | 148 × 210 | 5.8 × 8.3 | Notebooks, flyers |
| A6 | 105 × 148 | 4.1 × 5.8 | Postcards |
B-Series (Posters)
| Size | Millimeters | Inches |
|---|---|---|
| B1 | 707 × 1000 | 27.8 × 39.4 |
| B2 | 500 × 707 | 19.7 × 27.8 |
| B3 | 353 × 500 | 13.9 × 19.7 |
| B4 | 250 × 353 | 9.8 × 13.9 |
| B5 | 176 × 250 | 6.9 × 9.8 |
English Traditional Paper Sizes
Traditional British paper sizes are still used for book publishing, artistic applications, and specialty printing. These sizes have historical significance and specific use cases.
| Name | Inches (W × H) | Millimeters (W × H) | Modern Applications |
|---|---|---|---|
| Quarto | 10 × 8 | 254 × 203 | Art books, portfolios |
| Foolscap | 13 × 8 | 330 × 203 | Specialty stationery |
| Imperial | 9 × 7 | 229 × 178 | Artistic prints |
| Kings | 8 × 6.5 | 203 × 165 | Luxury stationery |
| Dukes | 7 × 5.5 | 178 × 140 | Greeting cards |
Visual Size Comparison: Compare sizes against the "Letter Size"
You will be able to visually how the shapes change from one size to the other.
8.5" × 11"
Quick Measurement Converter: Inches to millimeters, points to inches, and more
Frequently Asked Questions
- Letter (8.5" × 11"): The standard for almost all business and academic documents, reports, and flyers.
- It is common practice to print two pieces up on a Letter paper, which creates two very popular half-page sizes: 5.5" x 8.5" and 4.25" x 11"
- Dividing a Letter size sheet into 4, provides you with what is known as "quarter page size", 4.25" x 5.5"
- Tabloid/Ledger (11" × 17"): Used for newsletters, small posters, and large spreadsheets.
- 8.5" x 14" is a size that is obtained from a larger tabloid sheet. This size leaves behind a lot of waste. Therefore, legal size paper end up increasig the cost of a project. Avoid it if not essential.
- You can find additional resources under this Link to Additional Resources.
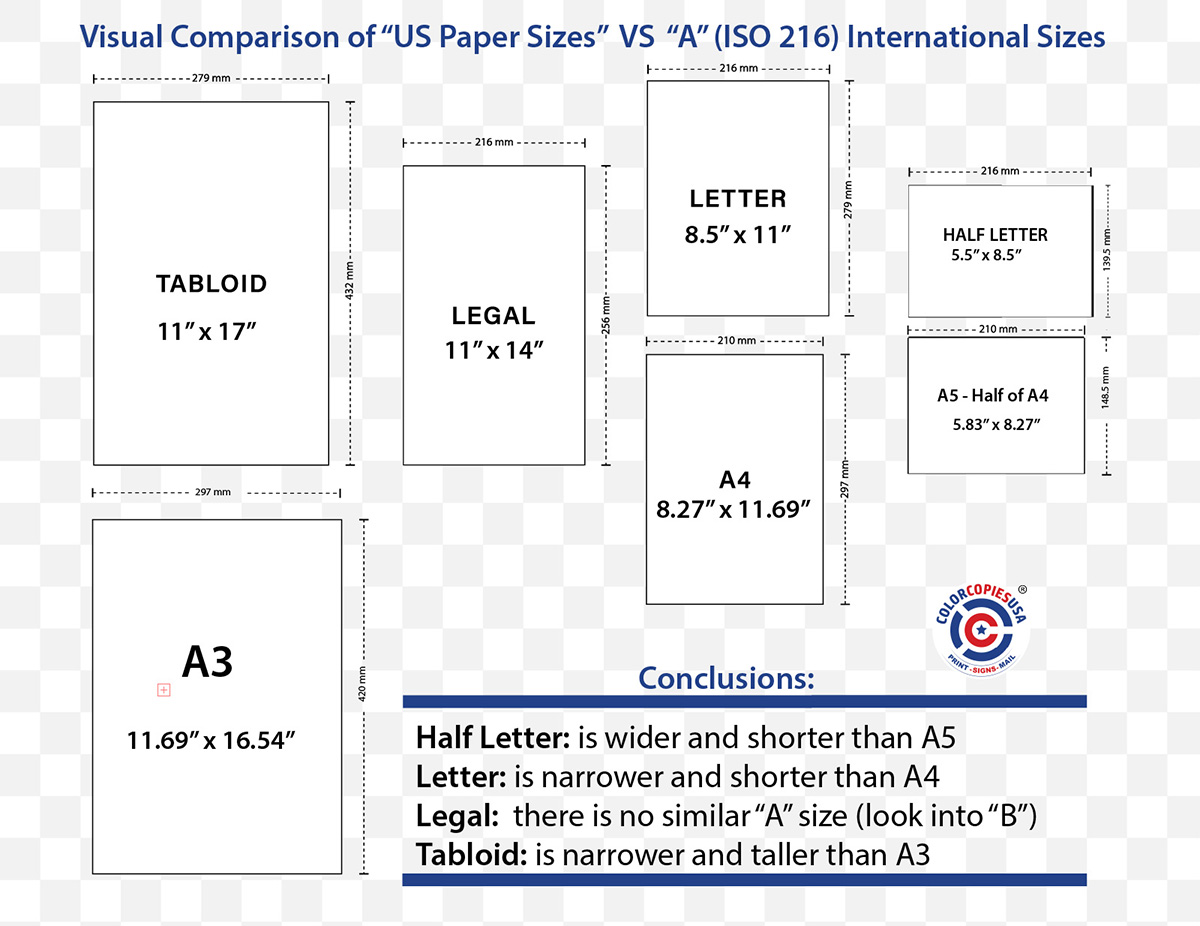
- A4 (210 × 297 mm): The most common size for business documents, letters, and reports worldwide. It is the international equivalent of US Letter.
- A5 (148 × 210 mm): Half the size of A4. Commonly used for notepads, booklets, flyers, and personal organizers.
- A6 (105 × 148 mm): Half the size of A5. The standard size for postcards, small pocketbooks, and invitations.
- The sizes of the paper are not random or have historic origin:
- They shrink or enlarge from one size to the other keeping the same aspect ratio.
- In this case, same aspect ration means that you can shrink the image, or scale it up, and the image will perfectly fit the smaller or larger paper size
- That is achieved by making the Long side's length = Short side's length * 1.414
- the number 1.414 is exaclty the square root of 2. That is why the ISO 216 system is called "the square root of 2" method
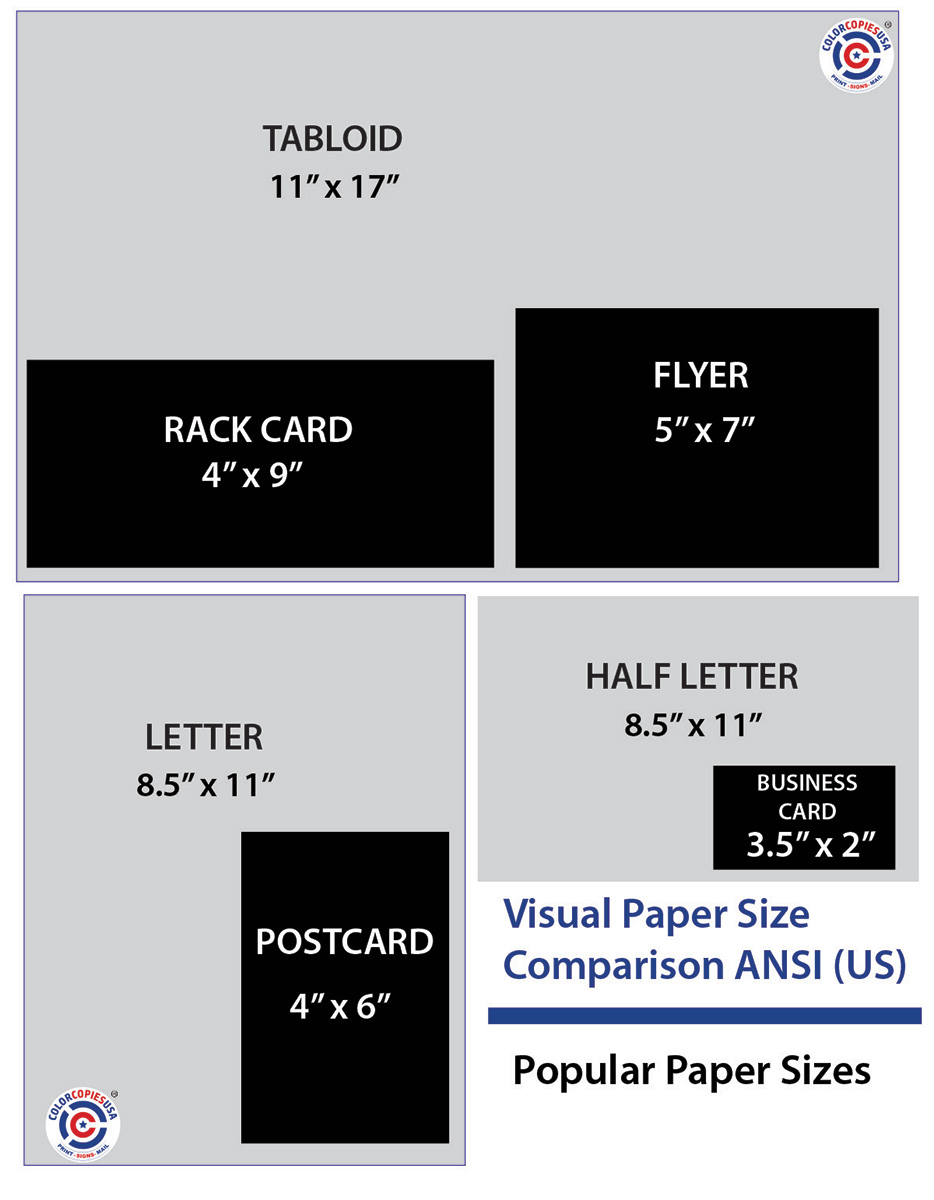
- Flyers on Paper (Text Stock): Common sizes are 8.5" × 11" (Letter), 5.5" × 8.5" (Half Letter), and 4.25" × 11" (Third Letter).
- Flyers on Cardstock (Cover Stock): Often called postcards or rack cards, popular sizes include 4" × 6", 5" × 7", 6" × 9", and 5.5" × 8.5".
- Set the canvas to your finished size.
- Turn on ‘Show print bleed’ and keep critical text inside the safe area.
- Export as a "PDF Print" with crop marks and bleed if available (or a high-quality PDF).
- You will notice that the size of your document is bigger than your final piece. This is correct and expected.
- This tells you that the final paper size that you expect is probably not the paper size that your printer will use to produce your order
- Before designing, tell your printer that you plan to mail the printed pieces. They’ll veer you to a postage-friendly size.
- The U.S. Postal Service has specific size requirements for different mail classes. For example, a standard letter must be at least 3.5″ high × 5″ long × 0.007″ thick and no more than 6.125″ high × 11.5″ long × 0.25″ thick.
- If your brochure is too small, it may be classified as a postcard, which has different postage rates and requirements.
- If it’s too large or too thick, it may be classified as a flat or package, which also has different rates.
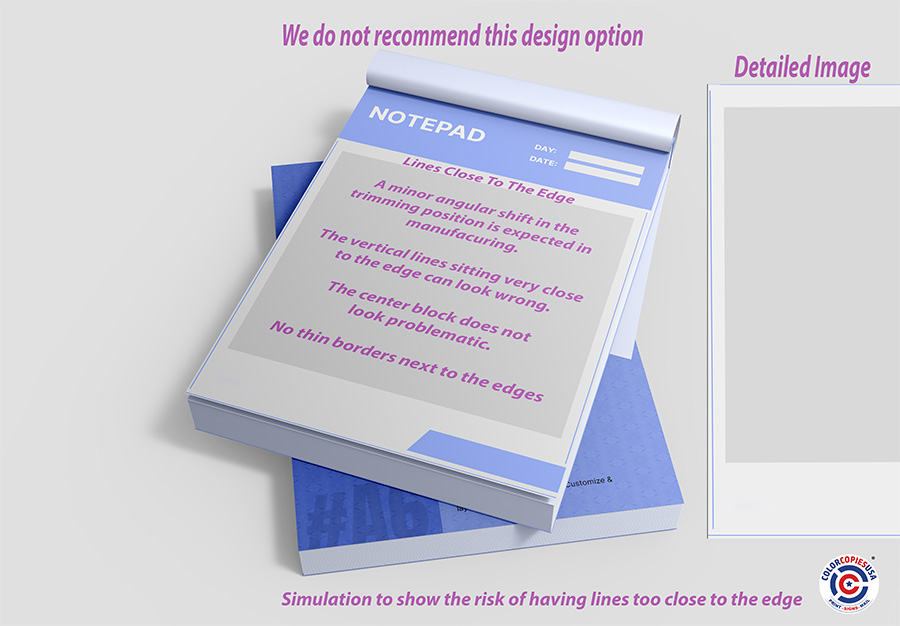
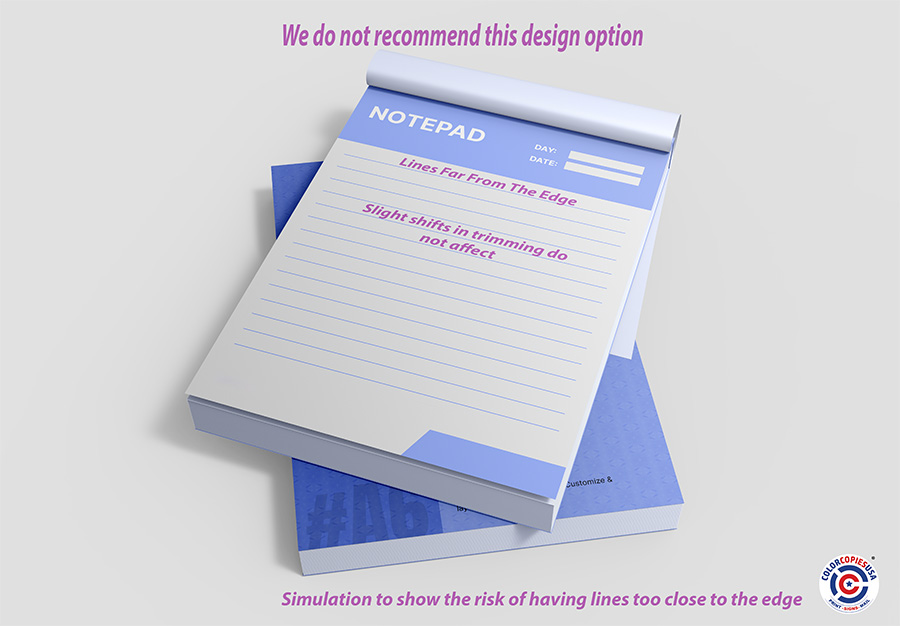
The images below show how much more noticeable the skew is in different cases. Be on the safe side.
- Mass handouts: 5.5″ × 8.5″ or 4″ × 6″ (budget-friendly).
- Counter displays/racks: 4″ × 9″.
- Info-heavy handout: 8.5″ × 11″.
- Poster-style handout: 11″ × 17″ (foldable to half).
If your audience is in the US, stick to inch-based sizes unless you have a specific reason to use the A-series.
There are small variations in the trimming process. Trimming has small tolerances (think ±1/32″–1/16″). That’s why bleed and safe margins are essential. You can expect deviations in the dimensions on normal commercial print work. If your project requires extreme precision, please discuss it with your printer.
Ask your printer for envelope-fit guidance before you design.
- The finished flat size is what you state first.
- Then, note the fold style (half, tri-fold, Z-fold) or perforation locations within the piece.
- Your printer might tweak panel widths slightly so folds line up perfectly.
- If you need a 3-hole punch to insert it in a binder, you should let your print provider know so that they can consider that request.
- 4″ × 6″ (postcard-ish, compact) ≈ 102 × 152 mm
- 5″ × 7″ (invitation-ish) ≈ 127 × 178 mm
- 4″ × 9″ (rack card) ≈ 102 × 229 mm
- 5.5″ × 8.5″ (half-letter) ≈ 140 × 216 mm
- 8.5″ × 11″ (letter) ≈ 216 × 279 mm
- 11″ × 17″ (tabloid) ≈ 279 × 432 mm
- A6: 105 × 148 mm
- A5: 148 × 210 mm
- A4: 210 × 297 mm
- It is always better to ask for guidance before you spend time creating your design.
- Call the team at ColorCopiesUSA.com to get some suggestions.
- Generally speaking, redoing the design is painful and takes a long time. If you don't know if it is a good idea to have images go to the edge, or how to mail your document, just ask before you start your work.
- A US Letter (8.5″ × 11″) has an aspect ratio of 11 / 8.5 ≈ 1.294.
- A half-letter (5.5″ × 8.5″) has an aspect ratio of 8.5 / 5.5 ≈ 1.545.
- Europe uses the ISO 216 “A-series” of paper sizes (A4, A5, etc.). (above on this page there is a table with the specific information)
-
Those sizes all share the same aspect ratio of the square
root of 2 (~1.414). This special ratio has two key
properties:
- This means: If you divide (cut or fold) any A-series sheet in half parallel to its shorter side, each half will have the same aspect ratio as the original. For example, folding an A4 (which is 1.4141 times longer than it is wide) gives you two A5 sheets, each with the same proportions.
- When you halve any A-size paper, the shape stays exactly the same.
- For example, an A4 folded in half becomes a perfect A5 with no shape change.
- That’s why the A-series scales so nicely.
To fit a U.S. half-letter sheet from an A4/A5 design, you must either crop some content or add padding (white bars or an extended bleed area) .
- Fit inside (no crop): You’ll get white bars on two sides.
- Fill the page (no bars): We must crop a little off the long dimension.
- If you don't mind stretching or shrinking unevenly your image, the printer can do that. Sometimes it is bearly noticeable, but if there are scales involved, you might want to avoid it.
- “Half-page” could mean half of A4 (which is A5), not half of US Letter.
- For a U.S. half-page, set your document to 5.5″ × 8.5″ (plus bleed when your project requires it).
- Change the canvas to 5.5″ × 8.5″ + bleed.
- Unlock design elements.
- Scale the background to cover the bleed area.
- Reflow text and images to keep them inside a 0.25″ safe margin.
- Avoid using thin borders near the edge.
- Scaling down is fine. S
- caling up can soften images. Make sure photos are 300 dpi at the final size (or use vector graphics and text).
- Using the PDF Print option from Canva helps, but always check the original image quality.
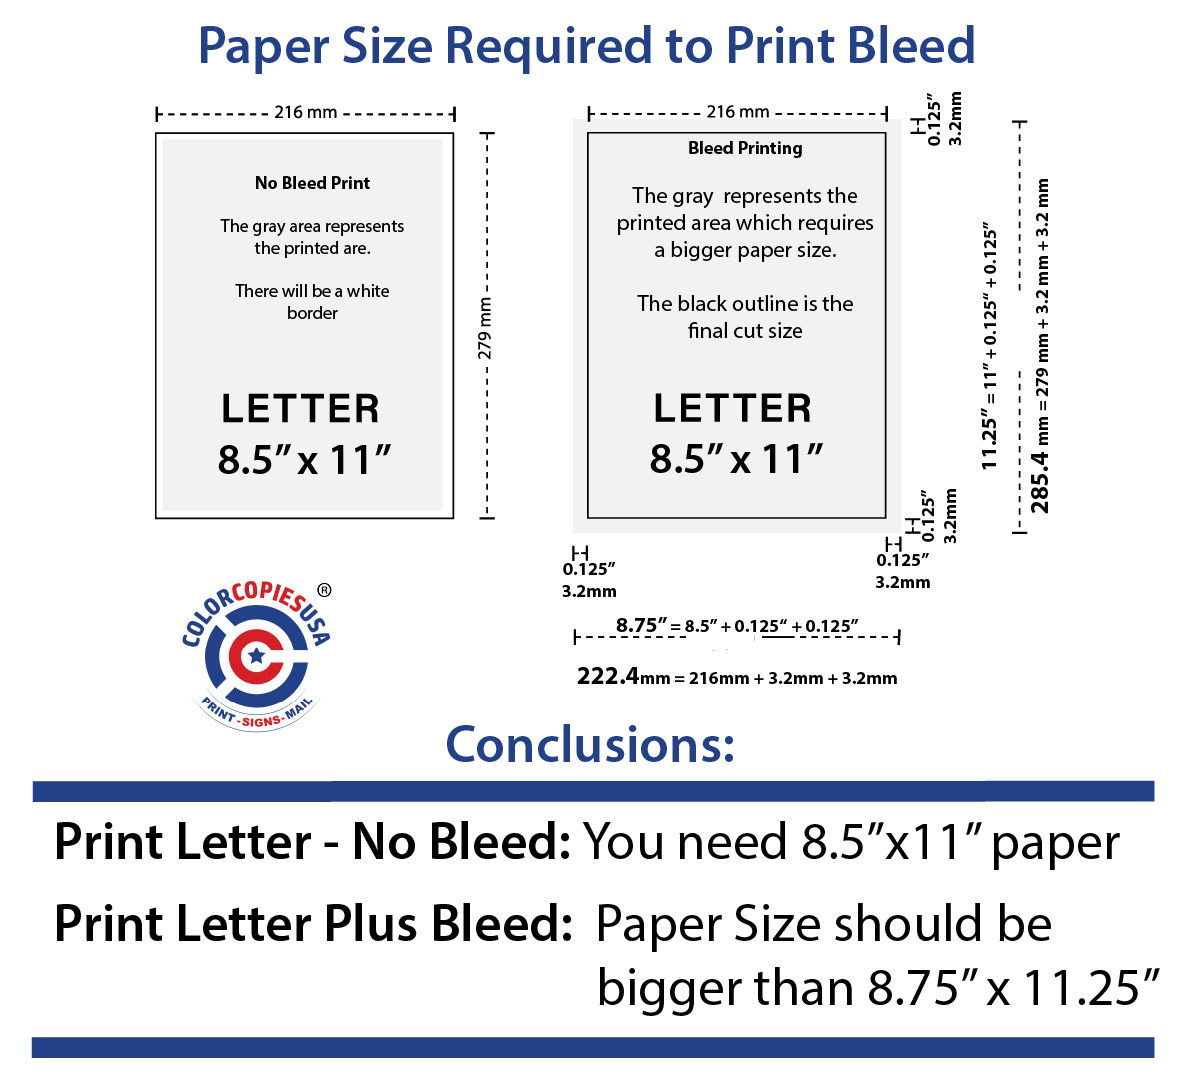
If your artwork touches the edge, we need an extra 0.125″ of image area past the trim line on all sides.
This ensures that no white sliver is visible after cutting—which is even more important when we must scale or crop the file to fix proportions.
Because you have to add 0.125" of additional image on each of the 4 sides of your design, you need to make your canvas 0.25" wider and 0.25" taller than the final cut size.
For a half-letter (5.5" x 8.5"), that means your canvas should be 5.75" x 8.75" if you want full-bleed printing.
- No cropping, bars OK: “Please fit the design inside 5.5″ × 8.5″ with bleed; I accept white margins or a background extension.”
- No bars, crop OK: “Please fill and crop to 5.5″ × 8.5″ full-bleed; keep critical content inside the safe area.”
- I’ll adjust the file: “I’ll re-layout the design to 5.5″ × 8.5″ + 0.125″ bleed; no bars or cropping will be needed.”
- If you’ll stick to U.S. sizes: Make separate canvases for Letter (8.5″ × 11″) and Half-letter (5.5″ × 8.5″)—don’t assume one scales perfectly into the other.
- If you may print internationally: Design in the A-series (A4/A5) to enjoy perfect halving.
- US Letter: 11 ÷ 8.5 = 1.294
- US Half-Letter: 8.5 ÷ 5.5 = 1.545
- A4 & A5: ≈ 1.414
- Confirm the target finished size (e.g., 5.5″ × 8.5″).
- Set your Canva canvas to that size + bleed (making it 5.75″ × 8.75″).
- Rescale the background to cover the entire bleed area; don’t leave white edges.
- Reposition key content inside a 0.25″ safe margin.
- Remove or adjust any thin borders near the edge.
📚 Want to learn more? Browse free guides on paper types, binding, file prep, and more in our Printing Academy.
Ready to Print with the Perfect Paper Size?
Our expert team can help you choose the ideal paper size and format for your project. Get professional color printing that makes an impact.
Get a Free QuoteUpload Your Files