
Maximizing Impact With Full Bleed Color Copies: A Comprehensive Guide
Full Bleed Color Copies: Complete Guide for Professional Printing
Master edge-to-edge printing to create eye-catching marketing materials that stand out. Learn what bleed is, why it matters, and how to prepare files correctly.
Get Started ↓Special Offer: Color Copies
$83.21 for 1,000 copies
20# paper • Choice of matte, glossy, and premium papers
View Pricing Options →
Published: February 18, 2019
Last Updated: November 6, 2025
In the competitive world of print marketing, the visual appeal of your materials can make or break their impact. Among the various techniques that enhance printed materials, full bleed color copies stand out as a game changer for creating professional, eye-catching marketing pieces.
This comprehensive guide covers everything you need to know about full bleed printing—from understanding the basics to preparing perfect files, analyzing costs, and choosing when this technique is worth the investment for your business.
What Is Full Bleed Printing?
Full bleed printing is a commercial printing technique where images and colors extend all the way to the edge of the paper with no white borders or margins. This is achieved by printing on oversized paper (typically 1/8" or 3mm larger than the final size) and then trimming to the desired dimensions.
The result creates professional marketing materials where the design appears seamless from edge to edge, similar to how modern photos print at photo labs like CVS or Walgreens.
✓ WITH Full Bleed
✗ WITHOUT Bleed
How Full Bleed Works Technically
No printer—whether home desktop or commercial press—can physically print to the very edge of paper. The printing mechanism must grip the paper by its edges to feed it through. Here's how commercial printers overcome this limitation:
- Print Oversized: The design is printed on paper larger than the final size (e.g., 8.75" x 11.25" for an 8.5" x 11" final piece)
- Extend the Design: Your background colors and images extend beyond the final trim size into the "bleed area"
- Trim to Size: Industrial cutting equipment precisely trims the excess paper away
- Final Product: The result appears to be printed edge-to-edge with no white borders
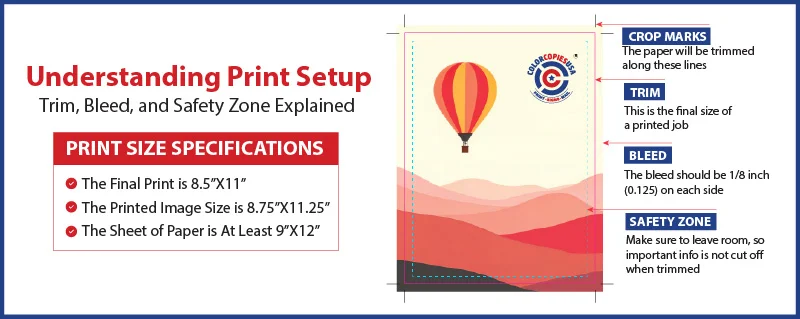
Understanding Bleed, Trim & Safe Zone
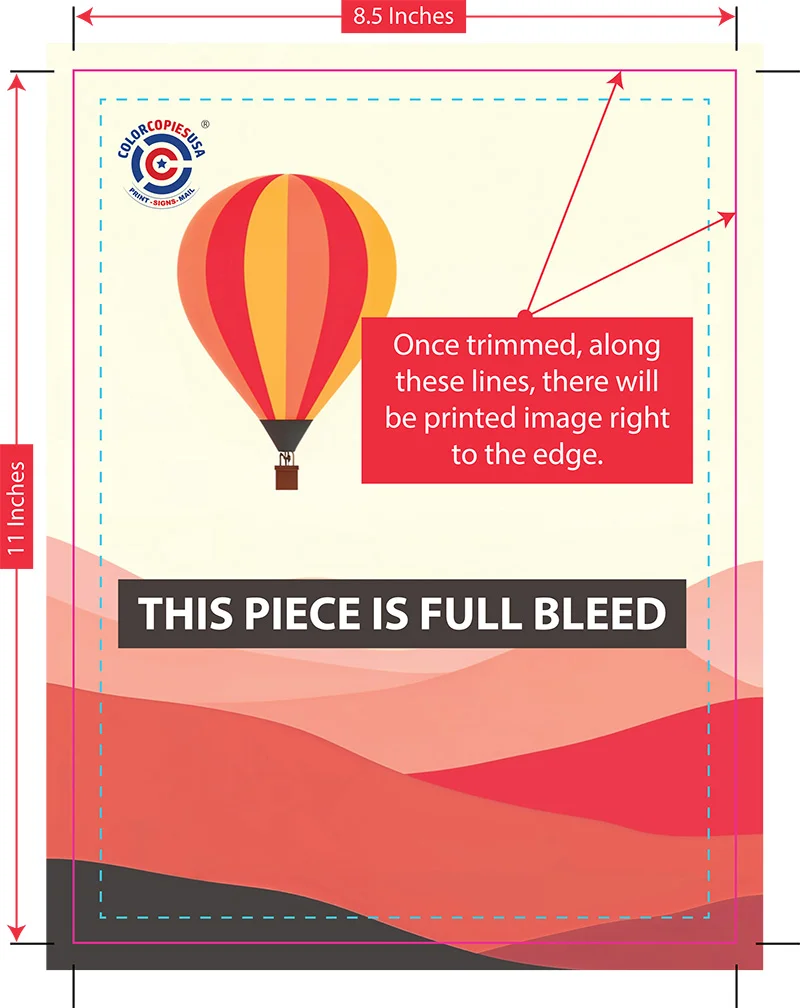
Key Measurements for 8.5" x 11" Final Size: File size 8.75" x 11.25" • Bleed 0.125" (red area) • Safe Zone 0.25" from edge (keep text here)
📊 Visual Learner?
See our illustrated infographic guide that shows bleed, trim, and safe zones with precise measurements and includes a downloadable reference sheet.
View Infographic Guide →Why Choose Full Bleed for Your Marketing Materials?
Full bleed printing offers significant advantages for businesses looking to create professional, high-impact marketing materials. Here's why it matters for your bottom line:
1. Higher Perceived Value & Professionalism
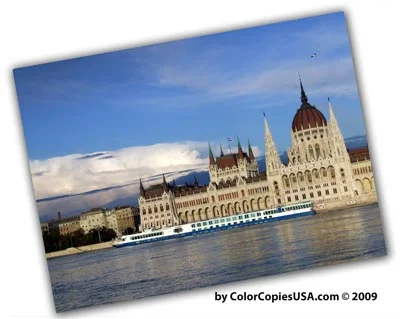
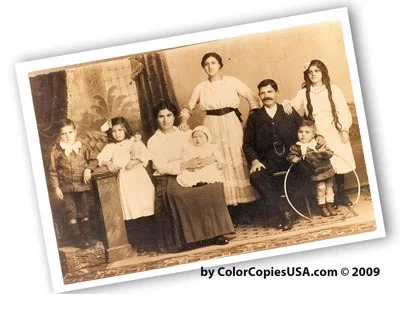
Marketing materials with full bleed are perceived as more professional and higher-value than those with white borders. This perception directly impacts how your business is viewed by potential customers.
Why it matters for your business:
- First impressions matter—full bleed signals you invested in quality
- Customers associate borderless printing with established, professional companies
- White borders often signal "homemade" or budget printing
- Higher perceived value justifies premium pricing for your services
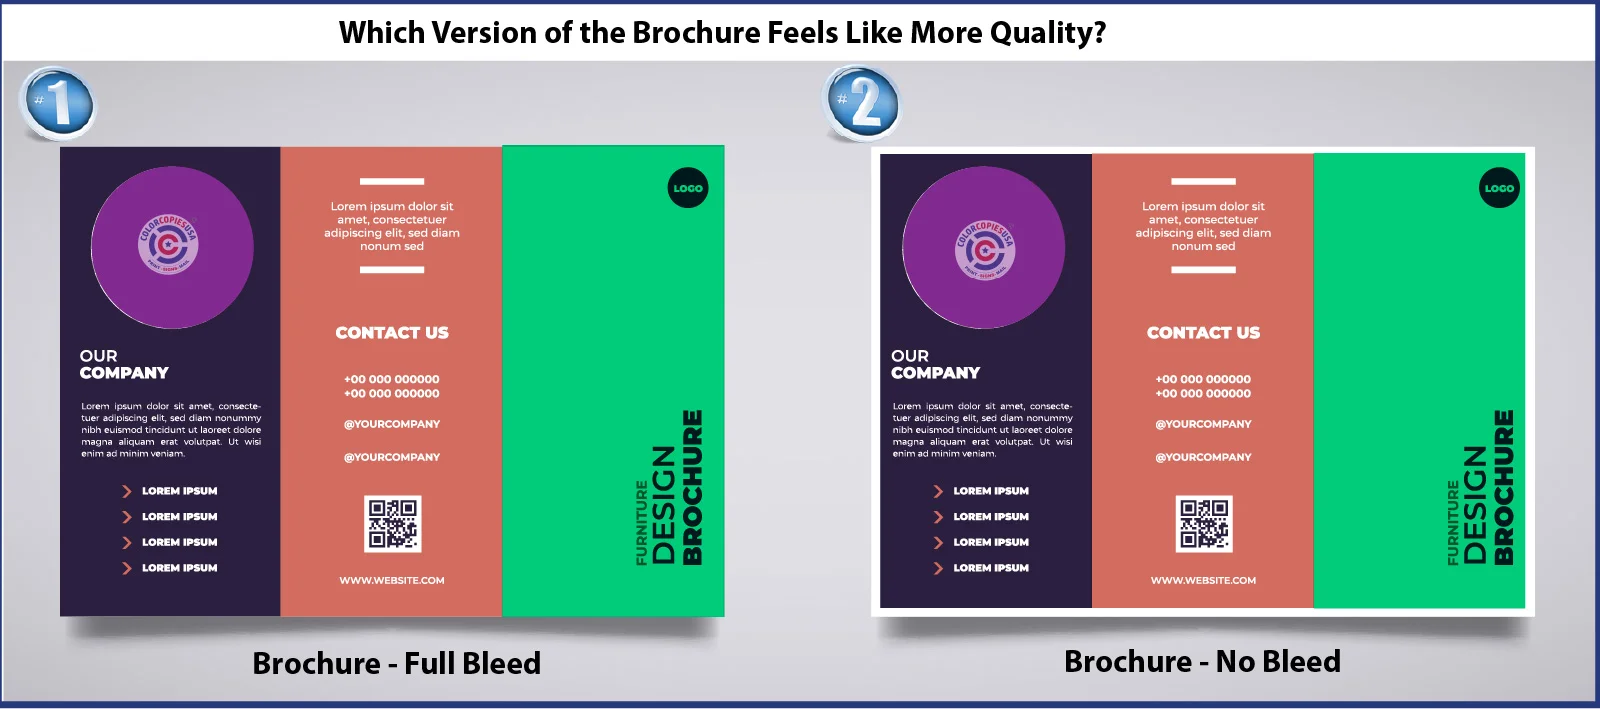
Left: Full bleed - modern, trustworthy,
professional
Right: No bleed - appears budget-conscious, less
polished
2. Maximum Visual Impact & Attention

With Bleed: Eye goes directly to message

Without Bleed: Border distracts from content
Marketing Psychology: Full bleed designs reduce visual clutter and guide the viewer's eye directly to your message. In today's attention-scarce environment, eliminating distractions can improve engagement by 20-30%.
Real-world application: When community organizers print event flyers with full bleed, they report higher event attendance. When small businesses use full bleed for product brochures, they see improved conversion rates.
3. Greater Design Flexibility & Creative Options
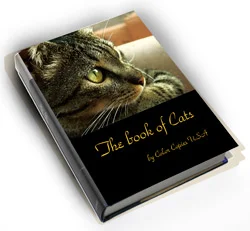
Full Bleed: Dramatic, immersive design
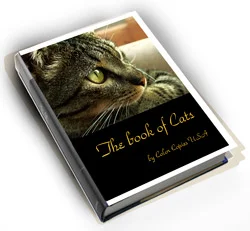
No Bleed: Constrained, less impactful
Full bleed opens up design possibilities that simply aren't available with bordered printing:
- Full-page photography: Showcase products or services with edge-to-edge images
- Bold color backgrounds: Create strong brand presence with solid color fields
- Gradient effects: Design sophisticated transitions that flow off the page
- Modern layouts: Follow current design trends that favor borderless aesthetics
For designers: No bleed forces you to work within a constrained area, limiting creativity. Full bleed lets you use the entire canvas.
4. Industry Standard for Professional Publishing
Full bleed has become the expected standard in professional publishing and marketing:
- Major publications (New York Times Magazine, National Geographic, etc.) use full bleed exclusively
- Art books, coffee table books, and premium catalogs require full bleed
- Corporate annual reports and sales presentations use full bleed
- Trade show materials and booth graphics depend on full bleed
Bottom line: If you want your materials to compete with professional-grade marketing, full bleed isn't optional—it's essential.
Full Bleed vs. No Bleed: Complete Comparison
Understanding the differences between full bleed and no bleed printing helps you make informed decisions about which approach suits your specific project and budget.
| Feature | Full Bleed Printing | No Bleed Printing |
|---|---|---|
| Appearance | Design extends to paper edge • No white borders • Modern, professional look | White border/margin around design (typically 1/8" - 1/4") • Traditional appearance |
| File Size Required |
8.75" x 11.25" for 8.5" x 11" final (adds 0.125" per side for bleed) |
Exactly 8.5" x 11" (no extra size needed) |
| Cost | 15-25% higher (larger paper + trimming labor) | Standard pricing (no additional processing) |
| Professional Perception | High - Modern, polished, premium appearance | Moderate - Traditional, safe, acceptable look |
| Visual Impact | Maximum - Immersive, attention-grabbing | Standard - Familiar, predictable |
| Design Flexibility | High - Full-page images, bold backgrounds, gradients | Limited - Must work within margin constraints |
| Best For | Brochures • Flyers • Posters • Business cards • Marketing materials • Photo prints | Documents • Reports • Forms • Budget-conscious projects • Designs with intentional borders |
| Home Printer Compatible | No - Requires commercial printing & trimming | Yes - Any home/office printer works |
| Setup Complexity | Moderate - Requires understanding bleed & safe zones | Simple - Standard document setup |
| Turnaround Time | Same or +1 day (trimming adds minimal time) | Standard turnaround |
✓ Use Full Bleed When:
- Creating marketing materials (brochures, flyers, sell sheets)
- Printing business cards or postcards
- Designing posters or banners
- Making photo prints or image-heavy pieces
- Using bold background colors or gradients
- Creating materials to compete with professional brands
- Budget allows for the 15-25% cost premium
- Printing booklet or catalog covers
- Your design extends to the edges by intention
Use No Bleed When:
- Creating internal documents or reports
- Printing forms or worksheets
- Making training materials or manuals (interior pages)
- Working with tight budgets
- Design has a white background anyway
- Creating text-heavy documents with minimal graphics
- Need to print at home or on office printers
- Design intentionally includes a border or frame
- Making quick drafts or proofs
How to Prepare Files for Full Bleed Printing
Proper file preparation is critical for successful full bleed printing. Follow these guidelines to ensure your files print correctly without losing important content or showing unwanted white edges.
Understanding the Three Critical Zones
1. Bleed Area (Red Zone)
Size: 0.125" (1/8") beyond trim line on all
sides
Purpose: Safety margin for cutting variations
What goes here: Extend backgrounds, images, and
colors into this area
2. Trim Line (Green Line)
Size: Your final desired dimensions (e.g., 8.5"
x 11")
Purpose: Where the paper will be cut
Important: Cutting may deviate ±1/16" from this
line
3. Safe Zone (Blue Zone)
Size: 0.25" (1/4") inside the trim line
Purpose: Protection zone for critical content
What goes here: All text, logos, and important
design elements
Critical rule: File must be bigger than final size. For 8.5" x 11" final, create 8.75" x 11.25" file.
Step-by-Step: Setting Up an 8.5" x 11" Full Bleed File
📐 Calculate Your Dimensions
Final size: 8.5" wide × 11" tall
Add bleed: 0.125" to each side (4 sides total)
Calculation:
- Width: 8.5" + (2 × 0.125") = 8.75"
- Height: 11" + (2 × 0.125") = 11.25"
File size needed:8.75" × 11.25"
🎨 Design Guidelines
- Set canvas to 8.75" × 11.25" in your design software
- Extend backgrounds to all edges (they'll be trimmed)
- Keep text 0.25" from edges (inside the safe zone)
- Use high resolution: 300 DPI minimum
- Set color mode to CMYK for print
- Export as PDF with bleed marks included
⚠️ Critical Mistakes to Avoid
❌ Don't Do This:
- Creating file at trim size only (8.5" × 11")
→ Results in white edges after trimming - Stretching/scaling the image to add bleed
→ Trims off important parts of your design - Placing text too close to trim edge
→ Text gets cut off during trimming - Using RGB color mode instead of CMYK
→ Colors won't match what you see on screen - Low resolution images (under 300 DPI)
→ Prints look pixelated and unprofessional
✓ Do This Instead:
- Create file at bleed size from the start
(8.75" × 11.25")
→ Clean edges, no white borders - Add extra image around your design
→ Maintain your intended composition - Keep all critical elements 0.25" inside trim
→ Nothing important gets cut off - Design in CMYK color mode
→ Accurate color reproduction in print - Use 300 DPI or higher resolution
→ Sharp, professional-quality prints
| Product Type | Final Trim Size | File Size (with 0.125" bleed) | Safe Zone (keep content inside) |
|---|---|---|---|
| Letter | 8.5" × 11" | 8.75" × 11.25" | 8" × 10.5" area |
| Business Card | 3.5" × 2" | 3.75" × 2.25" | 3" × 1.5" area |
| Postcard | 4" × 6" | 4.25" × 6.25" | 3.5" × 5.5" area |
| Flyer (Half Letter) | 5.5" × 8.5" | 5.75" × 8.75" | 5" × 8" area |
| Tabloid | 11" × 17" | 11.25" × 17.25" | 10.5" × 16.5" area |
| Poster (18×24)* | 18" × 24" | 18.5" × 24.5" | 17.5" × 23.5" area |
*Large format prints (over 18") typically use 0.25" bleed instead of 0.125"
🛠️ Ready to Set Up Your Files?
Our complete software tutorial guide provides step-by-step instructions for setting up full bleed in Adobe InDesign, Illustrator, Photoshop, Microsoft Word, Canva, and more. Includes screenshots and video walkthroughs.
View Step-by-Step Tutorials →Full Bleed Printing Costs: What to Expect
Understanding the cost implications of full bleed printing helps you make informed budget decisions. While full bleed does cost more, the investment often pays off in improved marketing results.
Why Full Bleed Costs More
1. Larger Paper Required
Instead of printing on standard 8.5" × 11" paper, the printer must use oversized sheets (typically 8.75" × 11.25" minimum, often larger to accommodate trim marks and gripper margins).
Cost impact: 10-15% more for paper stock
2. Trimming Labor
After printing, each piece must be precisely trimmed using industrial cutting equipment. This requires:
- Skilled operator time
- Precision cutting equipment
- Quality control inspection
- Handling and setup time
Cost impact: 5-10% more for finishing labor
3. Higher Waste Factor
The trimmed excess paper cannot be reused, creating waste. Additionally, setup and calibration of cutting equipment produces some rejected pieces.
Cost impact: 2-5% more for waste allowance
Total Cost Premium
Expected increase:15-25%
For most projects, full bleed printing adds $15-25 per 100 pieces compared to standard no-bleed printing. Volume discounts apply to larger orders.
Real-World Pricing Examples
Color Copies (8.5×11)
| Quantity | No Bleed | Full Bleed |
| 100 copies | $35 | $42 (+20%) |
| 500 copies | $125 | $148 (+18%) |
| 1,000 copies | $210 | $248 (+18%) |
Business Cards
| Quantity | No Bleed | Full Bleed |
| 250 cards | $45 | $50 (+11%) |
| 500 cards | $65 | $73 (+12%) |
| 1,000 cards | $95 | $108 (+14%) |
Note: Business cards almost always use full bleed—it's the industry standard.
Brochures (Tri-fold)
| Quantity | No Bleed | Full Bleed |
| 250 brochures | $180 | $218 (+21%) |
| 500 brochures | $295 | $350 (+19%) |
| 1,000 brochures | $485 | $570 (+18%) |
Is Full Bleed Worth The Investment?
While full bleed does cost more upfront, consider the return on investment for marketing materials:
Marketing ROI Factors
- Higher perceived value justifies premium pricing for your services
- Increased response rates from more professional appearance (typically 15-30% improvement)
- Better brand positioning against competitors using budget printing
- Longer shelf life as materials don't look dated quickly
- Improved customer trust from quality presentation
Example ROI Calculation
Scenario: Real estate agent printing 1,000 property flyers
- Full bleed cost: $248 (vs. $210 no bleed)
- Additional investment: $38
- If full bleed increases response rate by just 20%:
- 2 extra property showings → 1 extra sale
- Commission on one $300k home: $9,000
- ROI: 23,600% return on $38 investment
Even a 5% improvement in response rate delivers massive ROI for marketing materials.
When No Bleed Makes Financial Sense
Full bleed isn't always necessary. Skip it and save money when:
- Internal documents that won't be seen by customers (training materials, internal reports)
- High-volume transactional printing where cost-per-piece matters most (invoices, statements)
- Draft or proof copies for review before final printing
- Designs with white backgrounds where borders wouldn't be visible anyway
- Budget-critical projects where every dollar counts (nonprofit flyers, community announcements)
- Short-run test campaigns before committing to larger quantities
Full Bleed Printing Applications by Industry
Different industries and use cases benefit from full bleed printing in specific ways. Here's how small businesses and community organizers can leverage edge-to-edge printing effectively.
🏢 Real Estate
Best uses for full bleed:
- Property flyers with full-page photos
- Open house announcements
- Luxury listing presentations
- Agent business cards
Why it works: Full-page property photos create emotional impact. White borders make expensive homes look budget-marketed.
Example: A realtor switching from bordered to full-bleed property flyers reported 35% more showing requests, attributing the increase to "looking like luxury properties deserve."
🍽️ Restaurants & Cafes
Best uses for full bleed:
- Menu covers (inside pages often no bleed)
- Table tents and promotional cards
- Takeout menus
- Event announcements (wine dinners, specials)
Why it works: Full-bleed food photography makes dishes look more appetizing. Professional presentation justifies higher menu prices.
Example: A farm-to-table restaurant uses full-bleed seasonal menus with edge-to-edge farm photos, reinforcing their fresh, quality positioning.
📅 Event Planning & Nonprofits
Best uses for full bleed:
- Event invitations and announcements
- Fundraising gala materials
- Conference programs
- Awareness campaign posters
Why it works: Full bleed creates excitement and importance. Events promoted with professional materials get higher attendance.
Example: A community fundraiser switched to full-bleed invitations and saw ticket sales increase 28%, with attendees commenting the event "looked worth attending."
💼 Professional Services
Best uses for full bleed:
- Business cards (standard practice)
- Presentation folders
- Service brochures
- Case study one-pagers
Why it works: Professionals must project competence. Full bleed signals attention to detail and investment in quality.
Example: A financial advisor noticed prospects took his full-bleed brochures home 60% more often than his old bordered versions, creating more follow-up opportunities.
🎨 Creative Businesses
Best uses for full bleed:
- Portfolio prints and leave-behinds
- Gallery show announcements
- Photography business cards
- Design service sell sheets
Why it works: Creative professionals are judged by their own marketing. Borders suggest they don't understand modern design.
Example: A photographer's full-bleed portfolio pieces showcase her work edge-to-edge, letting images speak without distracting white frames.
🏪 Retail & E-commerce
Best uses for full bleed:
- Product sell sheets
- In-store promotional posters
- Catalog covers
- Packaging inserts
Why it works: Retail competes on visual impact. Full-bleed product photos draw attention and increase perceived product value.
Example: An online boutique includes full-bleed product cards with orders. Customers post them on social media because "they're too pretty to throw away," creating free marketing.
| Product Type | Full Bleed Recommendation | Notes |
|---|---|---|
| Business Cards | ESSENTIAL ✓ | Industry standard. Bordered business cards look unprofessional. |
| Brochures | HIGHLY RECOMMENDED ✓ | Especially covers. Interior pages can be mixed based on design. |
| Flyers | RECOMMENDED ✓ | Significantly increases attention and takeaway rate. |
| Posters | ESSENTIAL ✓ | White borders severely reduce visual impact for posters. |
| Postcards | HIGHLY RECOMMENDED ✓ | Full-page images perform better in direct mail. |
| Booklet Covers | RECOMMENDED ✓ | Creates professional first impression. Interior pages often no bleed. |
| Presentation Folders | ESSENTIAL ✓ | Must use full bleed to look professional. |
| Training Manuals (interior) | OPTIONAL | Cover: yes. Interior pages: usually no bleed for cost savings. |
| Forms & Worksheets | SKIP ✗ | No benefit. White borders actually help with form structure. |
| Reports (internal) | SKIP ✗ | Cost savings. Unless client-facing, no bleed is fine. |
Frequently Asked Questions About Full Bleed Printing
Get quick answers to the most common questions about full bleed printing, file preparation, and costs.
Full bleed printing is a commercial printing technique where printed content extends all the way to the edge of the paper with no white borders or margins. This is accomplished by printing on oversized paper (typically 1/8 inch or 3mm larger on all sides than the final size) and then trimming to the desired dimensions.
The result creates professional marketing materials where the design appears seamless from edge to edge. Think of how modern photos print at stores like CVS or Walgreens—the image goes right to the edge. That's full bleed.
Full bleed printing typically costs 15-25% more than standard printing because it requires larger paper stock and additional trimming labor.
Example pricing:
- 1,000 standard 8.5×11 color copies: ~$210
- 1,000 full bleed 8.5×11 color copies: ~$248
- Additional cost: $38 (18% premium)
The investment is often worth it for marketing materials, as the professional appearance can significantly improve response rates and brand perception. For high-value projects like sales presentations or client-facing materials, the modest cost increase delivers substantial ROI.
For an 8.5" x 11" final trim size, your design file must be 8.75" x 11.25" (adding 0.125 inches or 1/8 inch to all four sides for bleed).
The calculation:
- Width: 8.5" + (2 × 0.125") = 8.75"
- Height: 11" + (2 × 0.125") = 11.25"
Additionally:
- Keep all important text, logos, and design elements at least 0.25 inches (1/4 inch) inside the trim edge
- This "safe zone" protects critical content from being accidentally cut off during trimming
- Extend backgrounds, images, and colors all the way to the edges (into the bleed area)
Pro tip: Set up your design file with these dimensions from the start—don't try to add bleed later by stretching or scaling your design.
No, home and office printers cannot print full bleed because they must grip the paper by the edges to feed it through the machine. This creates an unprintable margin (typically 1/4 inch to 1/2 inch) around all four sides.
Full bleed requires commercial printing equipment and a two-step process:
- Print on oversized paper that's larger than your final size
- Professionally trim the excess using precision cutting equipment
This is why full bleed printing must be done through a commercial printing service like ColorCopiesUSA.com. The good news: professional full bleed printing is affordable and produces much better results than attempting workarounds on home printers.
Full bleed printing creates a more polished, modern appearance for several psychological and practical reasons:
- Eliminates distractions: White borders draw the eye away from your content and message
- Signals investment in quality: Full bleed costs more, so customers perceive you as willing to invest in quality materials
- Follows modern design standards: Professional publications and brands use full bleed almost exclusively
- Creates immersive experience: Edge-to-edge design engages viewers more fully
- Avoids "homemade" appearance: White borders are associated with home printers and amateur design
Marketing impact: Studies show that marketing materials with full bleed are perceived as having 20-40% higher value than identical content with white borders. This perception directly affects conversion rates—people are more likely to respond to materials that look professionally produced.
Real-world example: A B2B services company A/B tested identical brochures with and without full bleed. The full bleed version generated 32% more qualified leads from the same trade show, despite identical content and distribution.
Most commercial printing products can be printed with full bleed. Common applications include:
- Marketing materials: Brochures, flyers, sell sheets, catalogs, presentation folders
- Business stationery: Business cards, letterhead, postcards
- Large format: Posters, banners, yard signs, window graphics
- Publications: Magazine covers, booklet covers, annual reports
- Event materials: Invitations, programs, tickets, promotional cards
- Retail: Product tags, shelf talkers, table tents, menu covers
- Photography: Photo prints, portfolio pieces, art reproductions
When to skip full bleed: Internal documents (training manuals interior pages, forms, worksheets), drafts for review, or designs that intentionally include white backgrounds or borders.
The most common and costliest mistake is creating the file at the final trim size (e.g., 8.5" × 11") instead of adding bleed area (8.75" × 11.25").
What happens:
- The printer extends your image to create bleed, often cropping important elements
- OR: white edges appear after trimming because there's no extra image to trim off
- Result: Reprinting costs money and delays your project
The second biggest mistake: Placing text too close to the trim edge
- Cutting machinery can vary by ±1/16 inch
- Text within 1/4 inch of the edge risks being cut off
- Always keep important content in the "safe zone" (0.25" inside trim edge)
Prevention: Set up your design file with correct bleed dimensions from the start. If you're unsure, use our software tutorials or submit your file for our free review service.
The process varies by software, but here are quick overviews for popular programs:
Adobe InDesign (Recommended for multi-page):
- File → New → Document
- Set page size to final trim (e.g., 8.5" × 11")
- In "More Options," set Bleed to 0.125" on all sides
- InDesign automatically adds the bleed area
Adobe Illustrator (Recommended for single-page):
- File → New
- Set Artboard to final trim + bleed (8.75" × 11.25")
- In "Advanced Options," set Bleed to 0.125" all sides
Adobe Photoshop:
- Create canvas at bleed size (8.75" × 11.25")
- Manually add guides 0.125" from edges for trim line
- Add guides 0.375" from edges for safe zone
Need detailed instructions?
Our Complete Guide to Creating Files With Bleed includes step-by-step tutorials with screenshots for Adobe InDesign, Illustrator, Photoshop, Microsoft Word, Canva, and Affinity products.
Ready to Print With Full Bleed?
Now that you understand full bleed printing, take the next step to create professional, edge-to-edge marketing materials for your business.
View Visual Guide
See bleed, trim, and safe zones illustrated with precise measurements. Includes a downloadable reference sheet and dimension calculator.
View Infographic →Learn File Setup
Step-by-step tutorials for setting up full bleed in Adobe InDesign, Illustrator, Photoshop, Word, Canva, and more design software.
View Tutorials →Get Instant Quote
Upload your file and get instant pricing for full bleed color copies, brochures, business cards, posters, and more. Free file review included.
Get Pricing →Need Help With Your Files?
Not sure if your files are set up correctly? Our prepress experts offer free file review to ensure your design prints perfectly with full bleed.
Mon-Fri, 9am-6pm ET
We respond within 2 hours
Related Resources
Professional Color Copies
High-quality color copying services with full bleed options. Choose from multiple paper stocks and finishes.
View Color Copy Options →Custom Brochure Printing
Professional brochures with full bleed printing, multiple folding options, and premium paper stocks.
Explore Brochure Options →